Broken Throttle Cable on the Highway
Joe Angell
My alternator started making a bad grinding noise. At first I thought it was a loose grill on the engine cover, since it sounded like sheet metal rattling, but it changed with engine speed, and soon became audible in the cabin when driving at highway speeds. It seemed to be coming from the rear right side of the engine bay.
Replacing the Alternator
I made it home without incident and ordered a new alternator. I have a 3.0L engine, so I ordered the Eagle Premiere alternator from Rock Auto. I didn’t take the alternator out until I tried to put the new one in, at which point I noticed it was a Remi 91330, which is not the alternator for a Premiere. I had forgotten that I actually need the 1993 Chevy Camaro alternator so that the bottom mounting hole is in the right place. Ironically, it’s easier to find a 2.8L alternator than it is the Premiere or Camaro alternator. I ordered one from RockAuto, but since it would take a week to get here I ordered a second from O’Reilly’s that I could pick up in store the next day.
I’ve replaced the alternator a few times before, so this is pretty straight forward for me at this point.
Disconnect the battery.
Remove the nut from the top of the alternator bracket.
Loosen the tensioning turnbuckle, then remove the bolt from the bottom.
Remove the belt from the pulley.
Remove the heavy wire from the back of the alternator.
Disconnect the plug to the alternator light in the instrument cluster.
Remove the top bolt and spacer, and lower the alternator out of the car.
Reverse steps to install the new alternator.
The Camaro alternator needs one more slight modification. There is a spacer at one end of the alternator where the bolt goes through, but this interferes with actually mounting it. In my original version of this post, I mentioned tapping it out and removing it, but that leaves a hole that is notably larger than the bolt is. I now believe that you want to keep it, but reverse it, tapping it back in from the other side but stopping before it comes out of the housing. This will ensure that it fits properly on the bracket in the car. I used a small socket and a hammer to tap it out.
The biggest issue I had was getting the nut off the starter wire. The exhaust headers got in the way and limited my ability to turn a wrench in there, but I did finally get it out.
There is also a spacer on the 3.0L that has to be reinstalled on the upper mount. It goes on the rearmost side of the alternator.
Once installed, my rattling was gone and the the battery even voltage read higher than before.
Tapping out the spacer so I can reverse it.
The new alternator installed in the car.
Starting Problems
The next morning I tried to go for a drive, but the car wouldn’t start. It would crank, and I had spark and fuel, but it just wouldn’t catch. I plugged in my tuning laptop and couldn’t find anything wrong with the engine.
After about a half an hour of randomly poking at things, it started. I turned it off and tried again, and it still started. I have no idea what was wrong, but at least it worked. I threw the tuning laptop behind the seat and went for my drive.
The Break, and Getting Off the Highway
As I accelerated onto the highway, I noticed that my throttle wasn’t going down as far as it could, like it had hit some kind of stop. Thinking it had gotten hung up on something, I pushed it as hard as I could and heard a loud “bang” from the pedal area, and the pedal moved freely to the floor. I pumped the pedal a few times with ease as the car started coasting. It appeared that I’d broken the throttle cable.
I was going about 45 MPH in the slow lane, so I turned on my caution lights and coasted to the breakdown line. There was a guardrail, so I couldn’t get over as far as I would have liked. The next exit was only a mile away, but it was slightly up hill and I wasn’t going to make it, but I coasted as far as I could. I soon noticed that I wasn’t actually stopping, and remembered that I have an automatic transmission, and automatics creep.
At this point I remembered that I had my tuning laptop with me. Since the creep is determined by the idle, I could work around my broken cable and get safely off the exit. I stopped the car, I plugged in the laptop and went to the closed loop idle curve in TunerStudio. From there I increased the warmed-up idle to 2000 RPM. When I took my foot off the brake, the car smoothly accelerated up to about 35 miles per hour. It even shifted into second. I had to stay in the breakdown lane, but it made it much safer to get to the exit and off the highway.
I waited for traffic to clear before going off the exist (35 MPH is still pretty slow for a highway). Unfortunately, this was one of this exits where once you pull off, you have to move over a lane to not go back onto the highway. I pulled over and again waiting for traffic to clear, then let go of the brake and changed lanes. It accelerated agonizingly slowly, but no cars came and I was able to get onto the main street, and from there into a parking lot.
Alternate Ways to Boost Idle
If I didn’t have my tuning laptop with me, I still could have made this work, as could anyone else who had this problem. I just would have had to get out of the car.
There is an idle adjustment screw on the throttle. You can simply turn this screw until the throttle is open enough to keep the engine at the RPMs you want. This is kind of dangerous to do when you’re on the side of the road, but arguably less dangerous than waiting in the breakdown lane for help to arrive.
If you open the screw too far, you may not be able to start the car again if you turn it off, since you’ll effectively have your foot down on the gas. You’re also driving only with the brake, which can overheat and unduly wear them if they’re trying to hold a high-revving engine back, although it probably isn’t a big deal for a short trip to the next exit. You also have no control over your cars acceleration beyond releasing the brake pedal — you can’t give it more gas on a hill. I felt 2000 RPM was enough to move a a reasonable safe speed without overtaxing the brakes and the rest of the car, and going any faster felt like it would be harder to compensate for this rather unique driving experience that I was just learning for the first time.
The Repair
Now that I was safely in a parking lot, I could see what had gone wrong. I first had to pull the climate control faceplate to release my hazard light switch. For some reason it gets stuck in the “on” position, and you can’t grip it without taking off the faceplate.
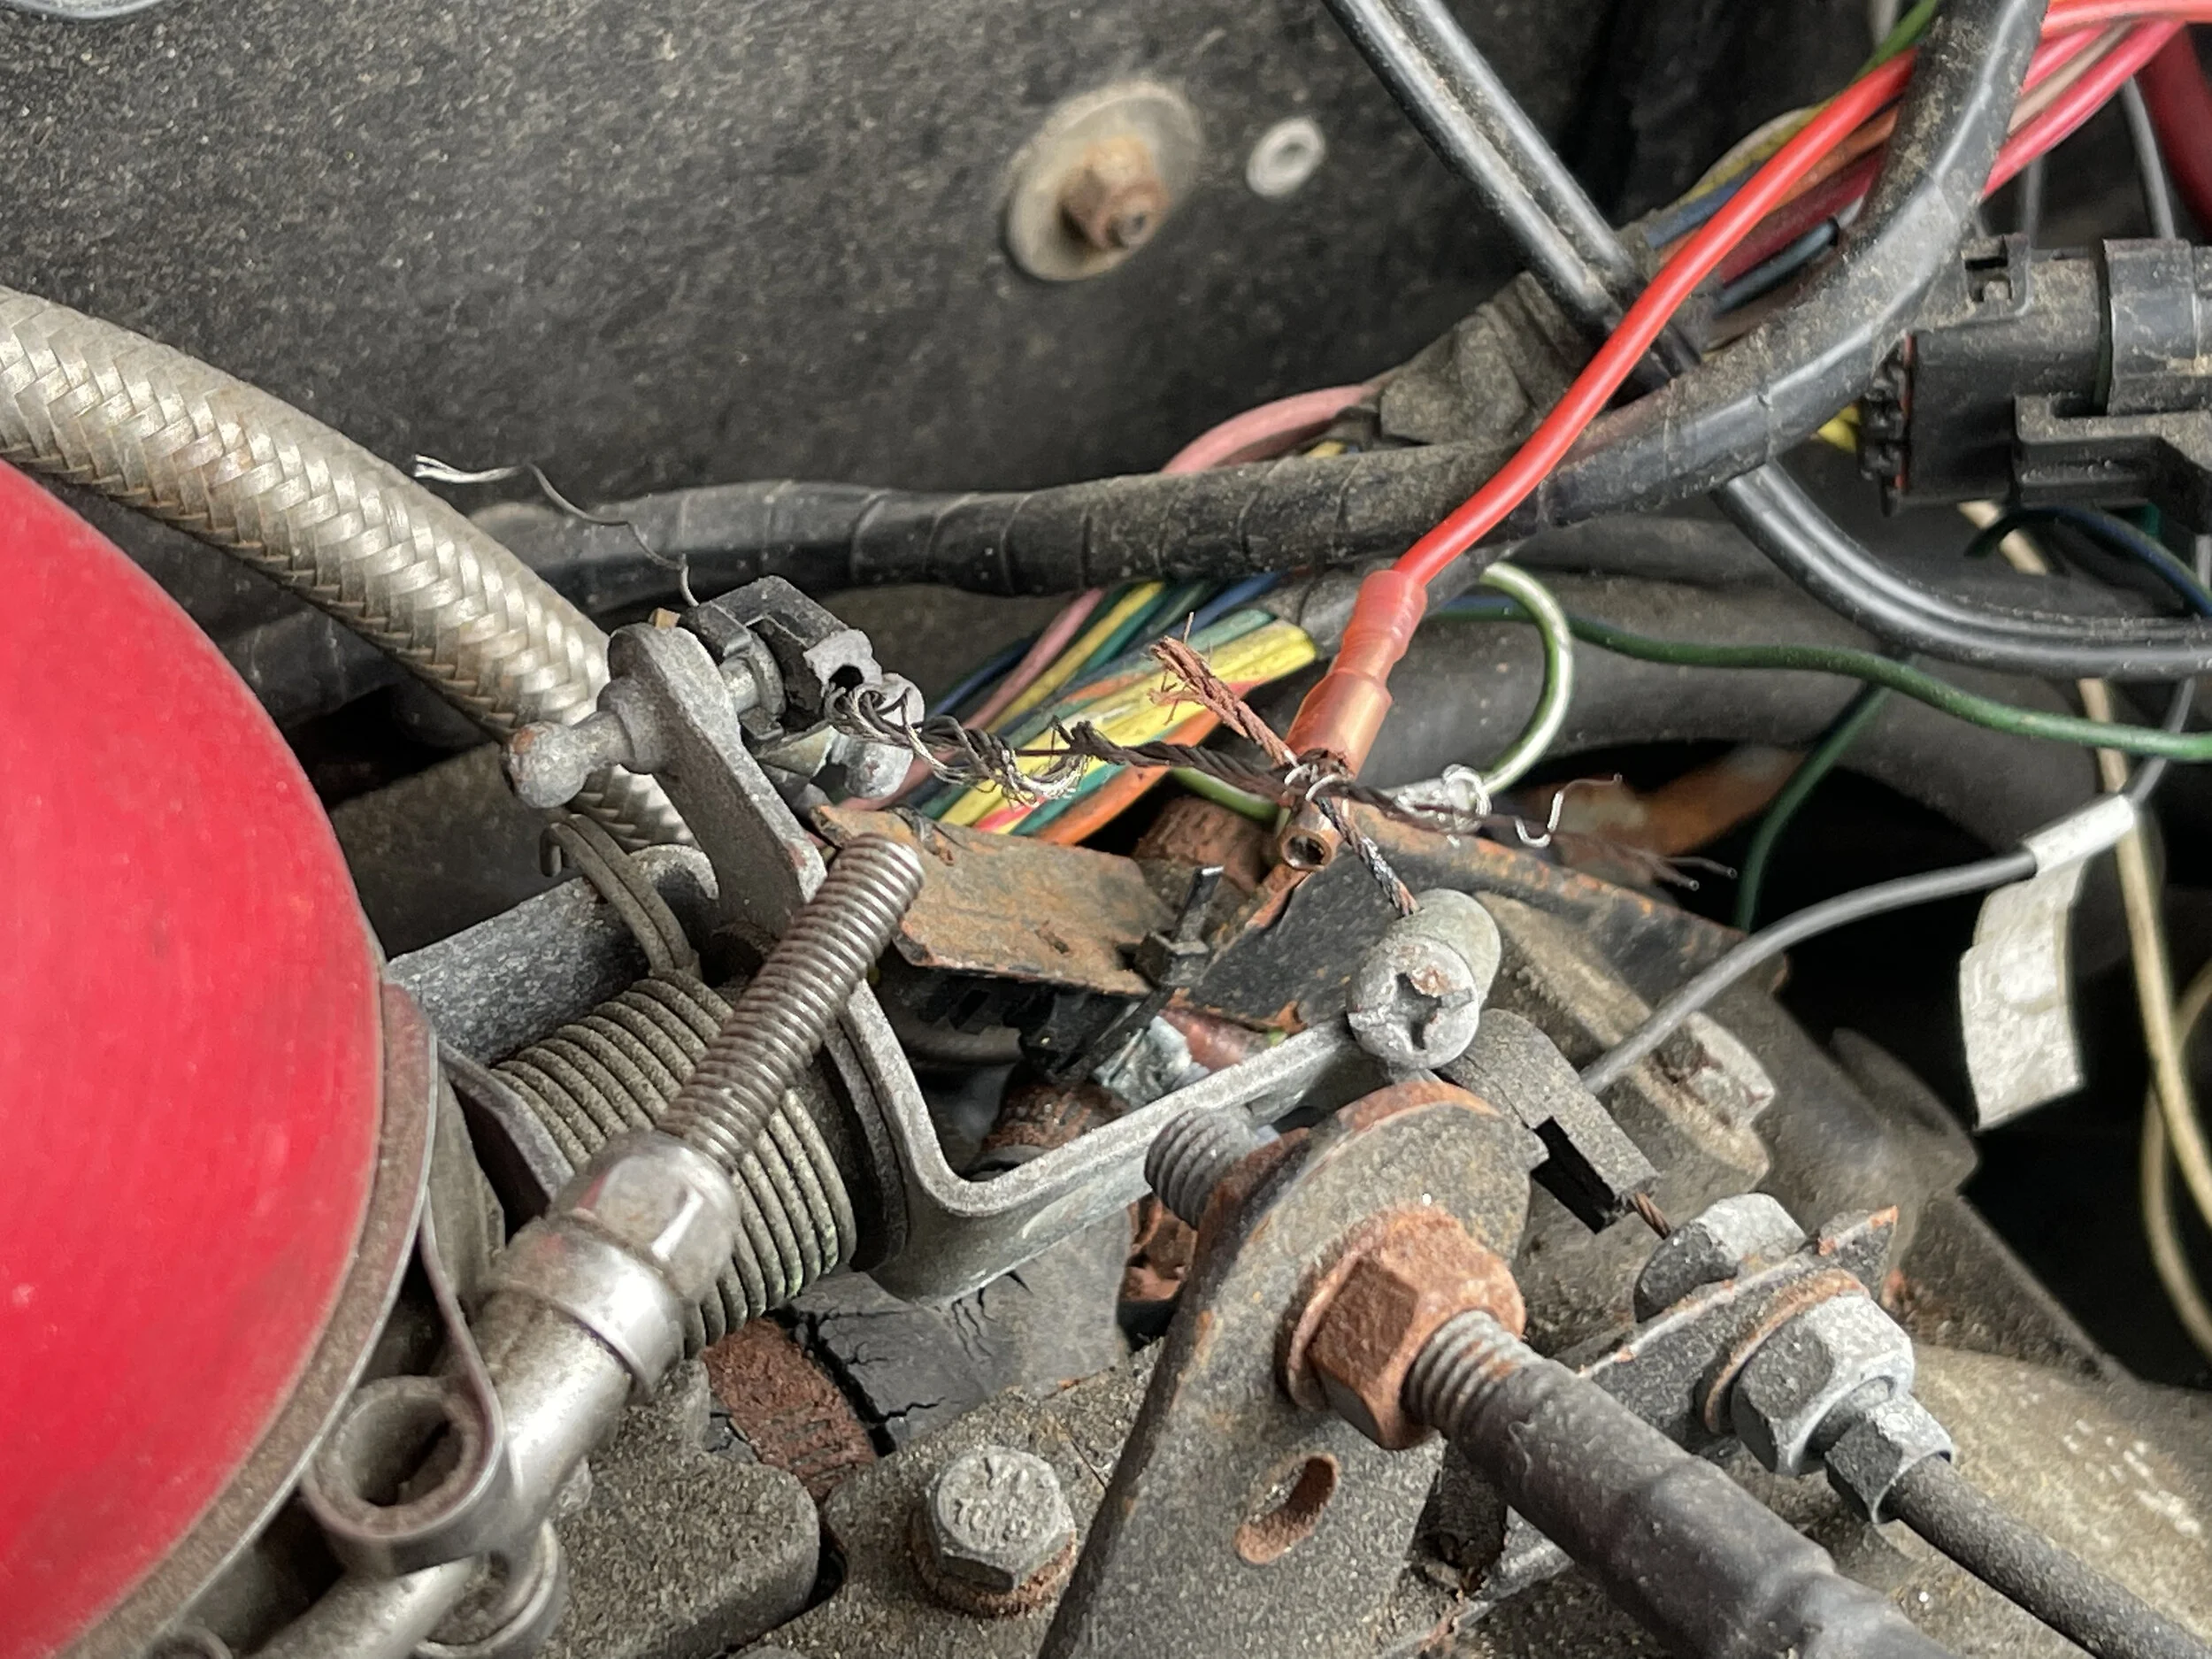
Next I checked the cable. It had broken in the engine bay at the throttle spool. It had been fraying, but I’d ignored it. It seems that it finally got hung up and the last strands snapped. The loud bang I heard from the pedal was probably just the cable rebounding into the sheath and the pedal slamming to the floor. I may 3D print an insert to protect the cable inside the end of the sheath to reduce the chance of this happening again.
The remaining part of the cable was completely inside the sheath. There was no way to pull it out and splice it back onto the remaining part on the throttle. There is a ball on the pedal end of the cable that meant that I couldn’t pull it any further. I removed the cable from the car by pulling it out from the pedal side. There’s a small clip with a cotter pin that secures it to the pedal arm. It’s a bit of a pain to reach, but not too bad. With the pin out, you can remove the clip and pull the cable through.
I called Zoe and she came to get me in our practical car, and we drove two miles down the road to Home Depot to purchase about seven and a half feet of 1/16th inch cable. We used the old cable for both length and diameter reference, and got two length so I’d have a spare in case this happened again.
I needed a way to secure the cable. I had a small brass cylinder specifically for this on the throttle side. You run the cable through a hole in it, then turn the screw to tighten it. The nearby auto parts store didn’t have any of these, but Home Depot had something that would do the trick. It was a 1/16th inch clamp set for making a loop. I didn’t need the loop bit, but the clamps worked perfectly.
I tried running the cable down the sheath from the engine side, but it got hung up near the pedal end, so I did pulled it and run it again from the pedal side. It got slightly snagged near the throttle end, but I gave it a turn and a push and it slid past and out the end of the sheath. I used the old brass clamp on the pedal end, since it as easier to do in the cramped space, and used the new clamp on the throttle end.
The car is now working great, and the pedal even moves smoother than before (now that it’s not getting stuck on a frayed wire). Total time was about 1-2 hours to diagnose the problem, wait for my ride and , get the replacement part and fix it. Having a toolkit for screwdrivers and wrenches didn’t hurt either, nor did the Leatherman I keep in my pocket. At some point I’ll have to pull the cable again to lubricate it, but for now it’s working just fine.
The broken cable at the throttle.
The new cable as installed on the pedal side. The brass cylinder with the screw is what I had on the throttle end. The cable goes through the hole and is locked in place with the screw. The stock cable has a ball on the end that serves the same purpose.
The new cable after being fed through the sheath from the throttle side. I cut off the excess with my Leartherman after attaching the clamp.
A 1/16” clip kit from Home Depot, which I used to secure the throttle side of the cable.
The new cable at the throttle side, with a new clamp to lock the cable in place.