Makin' Tracks
How to model and animate moving tank treads in Lightwave (version 3.0 or greater), as published in the November 1995 issue of the formerLightwave Pro.
...as published in Lightwave Pro, November 1995
For one of my internal projects, I needed a tracked anti-aircraft gun to menacingly roll over the terain. The problem was figuring out how to get the tank's tracks to roll at all. After tinkering around for a few hours, I finally came up with a convincing way to make turning, rolling, terrain-hugging tank tracks.
The first step is to make the tracks themselves. I'm going to go ahead and assume you've already built the rest of the tank. By that I mean you have the tank body that the guide wheels that attach to, and the guide wheels the tracks wrap around. While I'm at it, you should also have a scene file set up with the guide wheels parented to the tank's hull and set up accordingly. For this tutorial you can just download the objects I used, either the zipped Tank.zip or LHAed Tank.lha. Just decompress them into you Content directory, and everything will go into the right direectories. The scene file AA-Setup the moving treads after completing the tutorial; AA-NoTreads is everything but the tank treads in place -- a perfect starting point.
In order to figure out how long to make the tracks, you'll have to Measure (Options panel) around the wheels that the track will wrap around. Set up your tank in Modeler the way it would be in Layout, with the guide wheels in place on the body. Then just measure around the wheels. I took four measurements around the wheels and added them up get 7.1 meters. This will be the length of the track.
Select Box (Object panel) and hit "n" to bring up the Numeric options. Set the number of Segments on the Z axis to 100 segments. The Z axis size should be set to the length of the track, which you got in the last step (in my case, 7.1 meters). The width should be slightly wider than the width of your wheels, and the thickness just a centimeter or two.
You may want to add some extra details to the tracks. I did a low Bevel (Multiply panel, or "b") off of every other polygon from the Top view to get a tread effect. I also did another, lesser bevel on the bottom of the tracks for yet more detail.
Save this object as Track-Start. Move the track the length of two segements (polygons) on the +Z axis. Save this again as Track-Morph.
A slightly offset track
What you've just made is a flat tank track, and a copy of it moved a slight bit on the +Z axis. This will be used to move the track forward with a morph.
Moving by Morphing
Go into Layout and load up a scene that has your tank and it's wheels setup. Load both the Track-Start and Track-Morph objects. Parent the Track-Start object to your tank's hull, not the wheels, since you'll want them to spin seperately from the track. Move Track-Start so it is resting over the wheels, with the "back" end about mid-way between the front and rear tank wheels.
Go into the Objects Panel and set the Object Dissolve for Track-Morph to 100%. Set the Track-Start's Morph Target to Track-Morph. Track morph is there only as something to morph into, so it will never be seen. Now the whole morph is set up except for the envelope.
By editing the Envelope of the Morph Amount, the track will move forward or backward. It will only move two segments of track, though. but once we're done it will be a seamless transition. To make the track go forward, have the morph percentage start with 0% and go up to 100% over how ever many frames you want. To go backward, simply start from 100% and end at 0%. You will want to set the envelope's End Behavior to Repeat, too. This will all make more sense later on.
A track that moves forward and jumps back to the beginning over and over again is useless unless it wraps around the wheels of the tank. That's were bones come in.
Dem Bones
Bones are fairly painless in this case. All you need are a bunch of them. You don't even have to mess with any of the settings in the Bones Panel. We're going to use bones to bend the track around the wheels.
The way this works is a bit strange. You will want to set up your bones along the track in their rest position at Frame 0, and move your bones at Frame 1. This way it'll be easier to add more bones for greater control later.
Go into the Objects Panel and select the Track-Start object. This is the object you'll be adding all the bones to. Select Object Skeleton, and click Add Bone. Hit "p" to close the Bone Panel and go back to the Layout screen. This first bone is going to be used to "hold down" the rear end of the track. Thus, you'll want to position the bone so it is on the rear end of the track. Place the bone so the pivot is in the track, and the other end is pointing upward. If you think of the bones as the control rods of a puppet this setup will seem a little clearer. The more technically-minded of the you can think of these as the control handles of a B-spline.
Add two more bones by hitting the + key twice. Do not Add Child Bones, as this will only complicate things. Position Bone 2 so it is over the front-most wheel. Bone 3 should go further beyond Bone 2 by an amount equal to a diameter and a half of the front wheel. Don't forget to hit "r" to set the Rest Positon and activate each of the bones after setting the positions and creasting keys for each.
Now go to Frame 1. Take Bone 3 and rotate it 180 degrees so it is pointing downward. Drag it on the down until it is under the front wheel. The track should now be more or less bent around the front wheel. Notice how this doesn't quite work. The track is a little bit off the front of the front wheel. This is why we are doing all of our setup on Frame 0 and our final positioning on frame 1.
Go back to frame 0 and hit + to add another bone. Position Bone 4 so it is between Bones 2 and 3. Create a key for it and hit "r" to set the Rest Position. Go to Frame 1 and you'll notice your track is warped severly. Rotate it 90 degrees and position it slightly ahead of the rear wheel. This extra bone is used to keep the track against the front wheel.
That's the basics of setting up the tank track. This requires a fair number of bones to get it all working; I used 18 for mine. For an idea of what the bones would look like all set up, the images below show Frame 0 and shows Frame 1. Notice the front of the tank (right of the screen) for how those first three bones are set up.
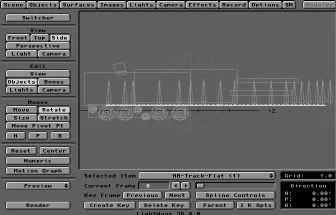
Frame 0: Straight Track

Frame 1: Track bent around the wheels
If you need to adjust a bone (and you will), you'll want to move it at Frame 0 and set the Rest Position again. If you move the bone at Frame 1, the track warps as the bone streaches it. If you first change the positioning on Frame 0 and reset the Rest Position, you can safely move it the same distance on Frame 1, and not have any nasty warping effects.
There are two other important bone placements. The bone at the rear end of the track on Frame 0 should be moved on Frame 1 so it exactly matches the first bone's position on Frame 1. That way the entire track smoothly wraps around the wheels.
The final trick is to put a last bone about two track segments (yes, we're back to that again) ahead of the front-most bone, so it is actaully off the end of the track. This should also be moved forward two segemnts past the last bone on Frame 1. The reason for this bone will make sense in the next step: how to get this thing moving.
Did I say bones were painless? I lied.
Let's Make Tracks
Remember that morphing setup we did way back when? Now is when we use it. Go to the Morph Amount Envelope for Track-Start. For a test, set Frame 0 to 0% morphed and frame 10 to 100% morphed. Make sure to set the End Behavior to Repeat. Now go ahead and make a wireframe preview.
When you play this back, the tank track should be smoothly turning around the tanks wheels. The reason for that last bone being put just forward of the front end of the track is to keep the track from warping as it morphs. Without that extra bone, the track starts bending away upward and ruining the illusion.
By now you've noticed a major limitation with this method: texture mapping. Since the track only moves two segments worth, the texture map has to be two segments long and be seamless, or else there will be a noticeable jump in the texture as the morph repeats. With a little work and some clever mapping, you can get around with a little work and a program like DeluxePaint.
I Failed Math...
To control the speed of the tracks, you simply have to adjust the number of frames the morph occurs over. Add more frames, and the tracks move slower. About five minutes of tinkering will be all you need to synchronize the turning of the tracks to the turning of the tank's wheels. If you want to be scientific about it, try the following:
R = Radius of Guide Wheel
L = Length of Track
D = Distance to move Track per full Guide Wheel rotation
Pi * (R² / L) = D
In other words, if you divide the circumference of the wheel by the length of the track, you get the distance the track sould move per each full (360°) rotation. You will have to meassure the distance of two segments worth of track in Modeler, and divide that by the distance to move the track, and you have the number of frames to morph the object over. As for an equation:
D = Distance to move Track per full Guide Wheel rotation
S = Distance of two segments of track
D / S = Number of frames to morph over
Remember to use meters for all of these distances! You can also use Joe Dox's Acceleration and Deceleration macros to control the rotation of the wheels, and thus figure out the amount to morph the tank tread. If I ever learn ARexx, I'll have write a script for this.
One of the great things about using bones for this is that you can have the tracks bend as the tank passes over different terrain. As it bumps over a rock, the track can compress against the wheel, and as the hull hangs in the air, the track can become more slack.
Making the track for the other side of the tank is very simple. Just use Clone Object on the first track. The morphing information and bones are all kept during the clone, so all you need to do is move the track over to the other side of the tank.
This method of making tank tracks gives you an incredible amount of control over making the track move and react to the terain. Once you get everything set up, it's very simple to control. Now all you need to do is make the terrain!