Replacing a Broken Automatic Transmission Dipstick Tube
Joe Angell
While I was lowering the transmission and engine back into my car, I wound up swinging it against the bulkhead and braking the automatic transmission dipstick tube. I got the engine and transmission mounted and got under the car to take a look.
Removing the Old Tube
At first I thought I'd just snapped the bracket at the bottom of the tube, so I took it out to inspect it. You'll need to drain the transmission first, as the fluid level sits higher than the bottom of the tube, but mine was already drained. I also found it is easier to get to the tube by rolling under the car feet-first from behind the engine instead of head-first as I often do. The bolt that holds the tube to the back of the engine wasn't attached yet, so I just had to remove the one holding the bracket to the transmission near where the tube sits above the pan. It's hard to get a socket in there, so I started with an 11mm box wrench and then moved to a socket once it was a bit looser.
The tube lifted out easily, but I noticed jagged metal where it meets the transmission. A quick look at the Parts Manual showed that it was broken -- the tube should have extended further than it was.
Back under the car, I used a pry bar under the lip of what was left of the tip and managed to pull it out a little. It was in there quite tight, and I actually snapped my pry bar trying to get it out. Once it was up high enough, I was able to clamp it around the sides with vice grips and lift it straight out.
Installing the New Tube
I got a new tube from DeLorean.com and compared the two. It looked like the new one was extended slightly less deep into the transmission, but I doubted that it would matter I also ordered an otterstat seal (106959) based on comments on DMCTalk that it worked much better than an O-ring. It took me a bit to figure out how to get it in, as it wouldn't fit when the seal was already installed on the tube. The trick is to install the seal into the hole in the transmission first, then slide the tube into that. It fits quite well, and worked perfectly.
The upper bracket also has to be transferred from the old tube to the new one. I had to use a 10mm socket on the bolt and a 9mm wrench on the nut. I also had to bend it apart with pliers to get it off the tube, and then bend it back and clamp it with an adjustable wrench so that I could run the bolt back through it.
The dipstick goes back in the car easily enough. I lowered it in from the top, then got under the car and tightened down the bolt with an 11mm socket to what I thought was reasonably tight. At this point I found I had another problem -- I'd stripped the hole in the transmission that holds the tube in place. It would need to be repaired before I could go any further, unless I wanted it to come loose and leak everywhere.
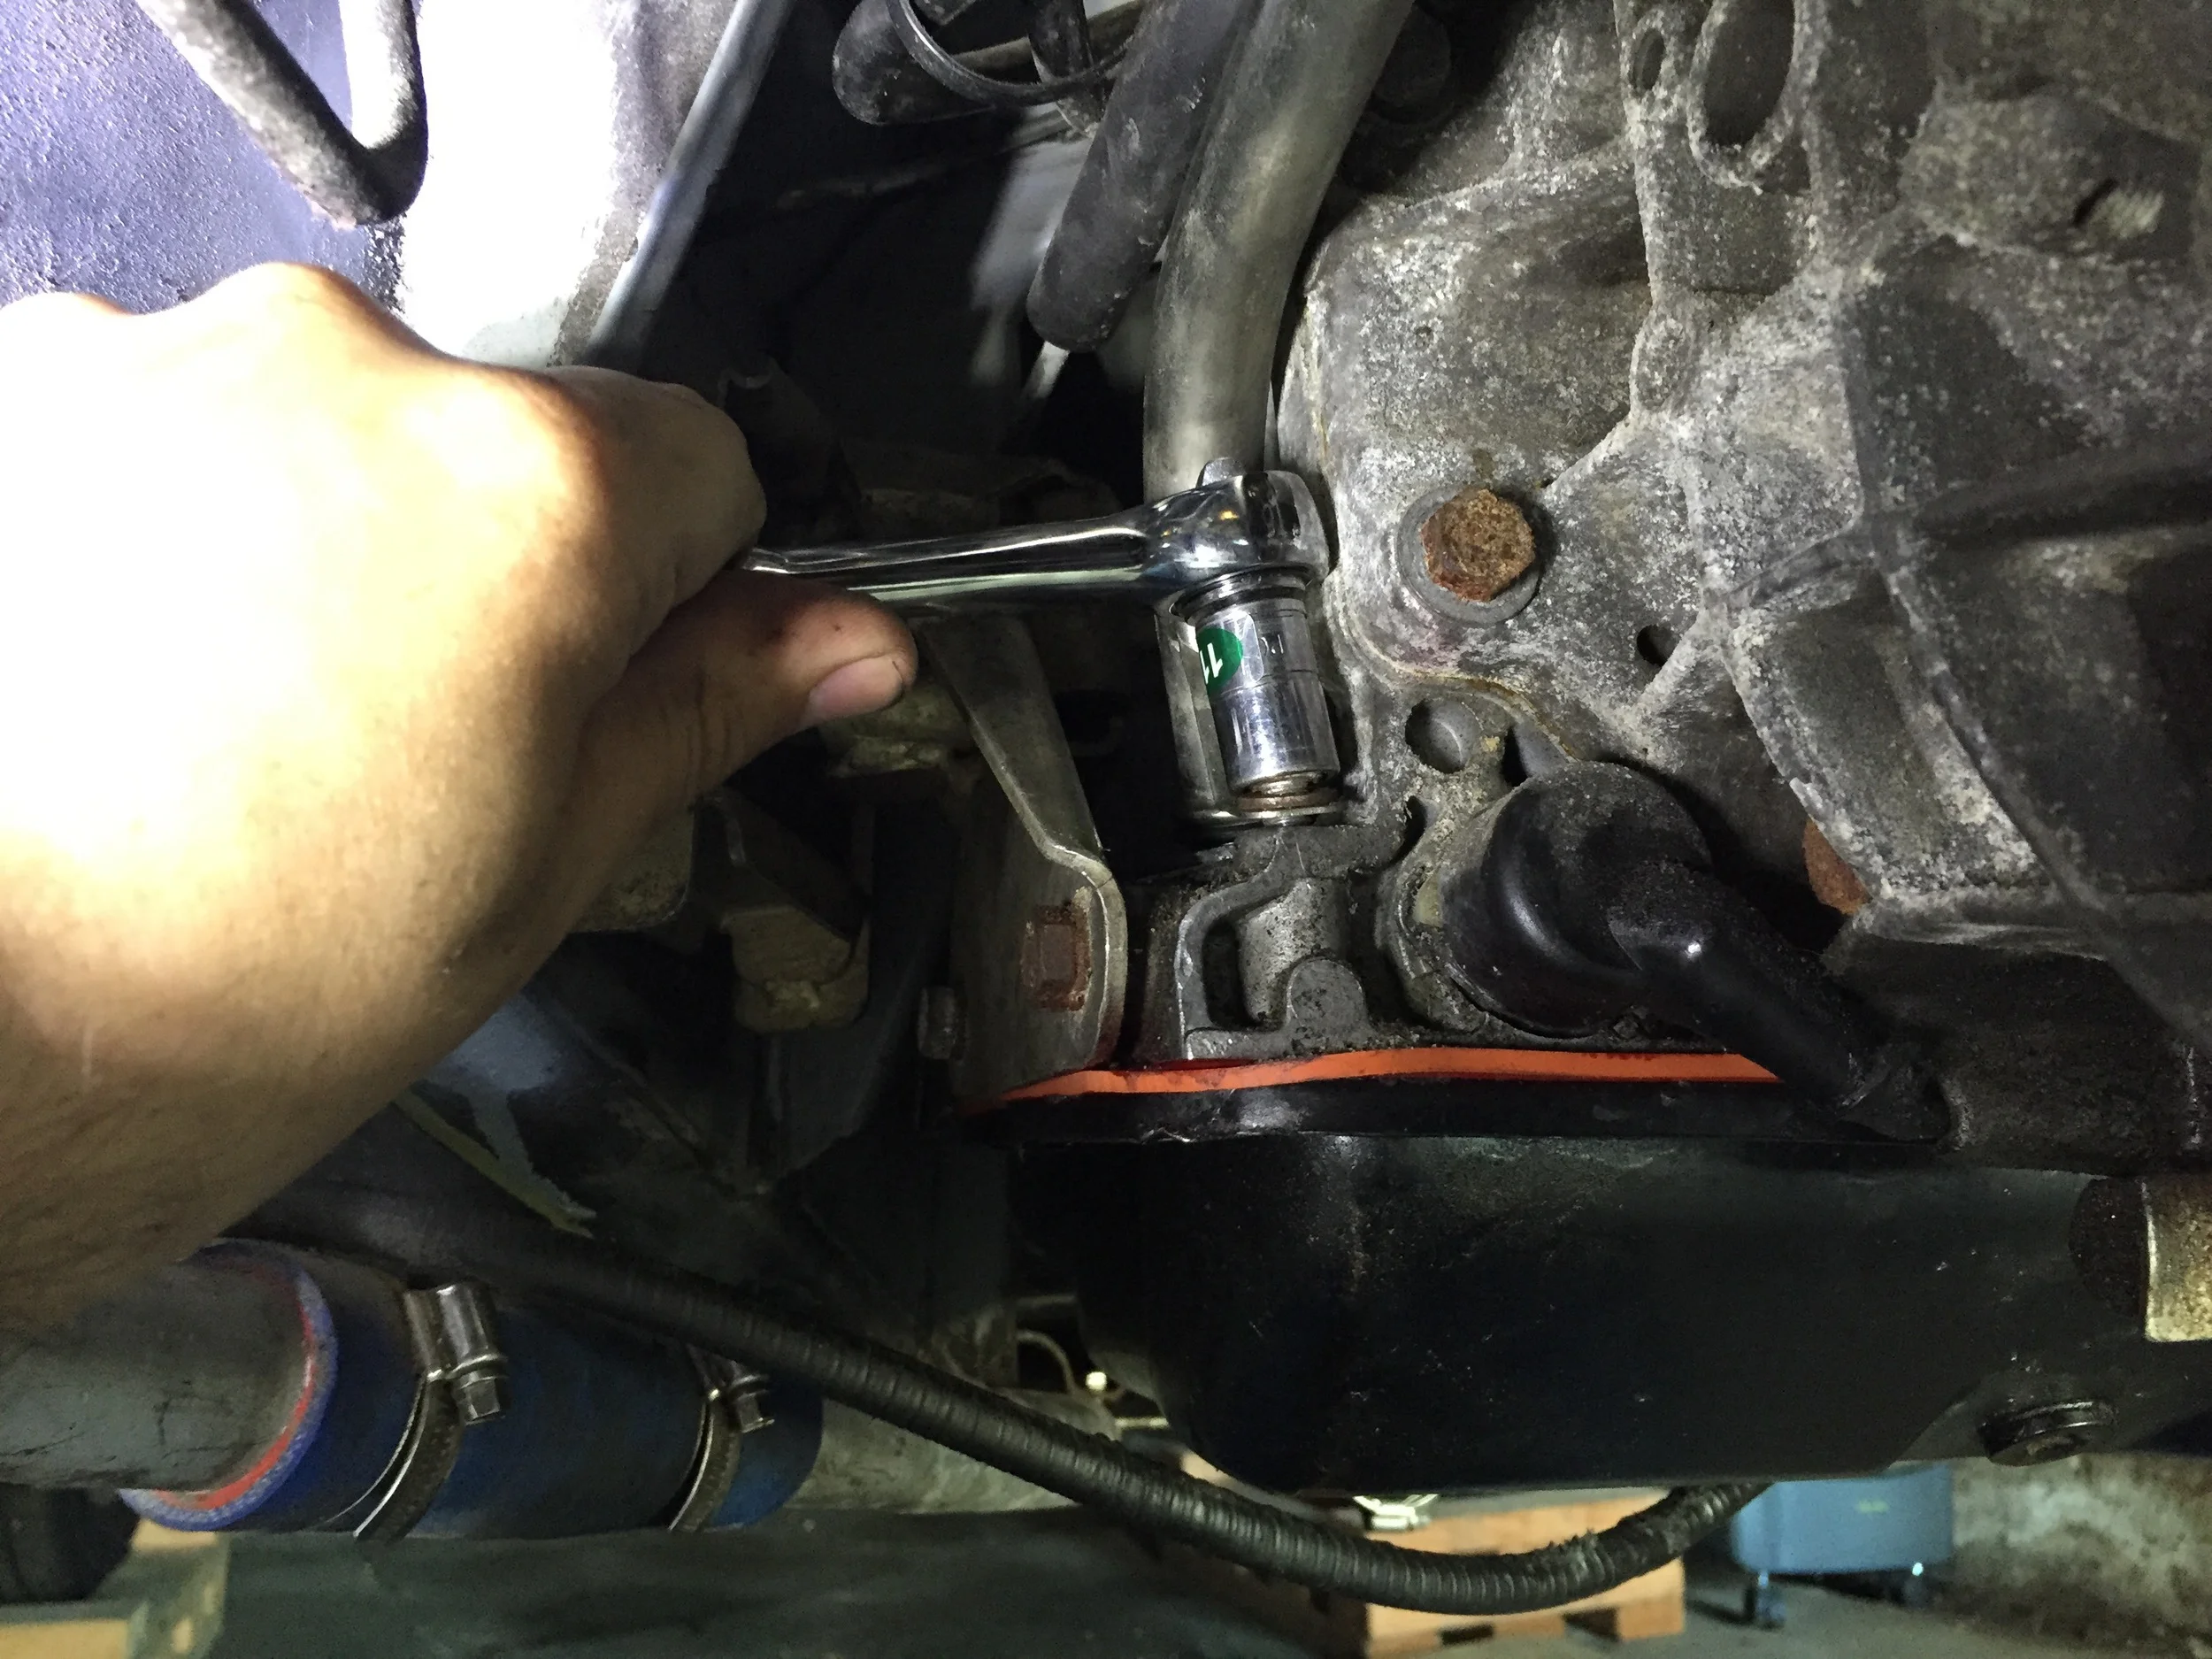
The broken tube (to left) and the piece I pulled out of the transmission (bottom left) next to the new tube (top) and the otterstat seal (bottom right).
Tightening the lower bracket bolt with an 11mm socket.
Re-Tapping the Bolt Hole in the Transmission
One other problem cropped up: I'd over-tightened the bolt holding the tube tot he transmission, and the threads were stripped. Not a problem; I had an M7 Timecert kit that I could use to repair it. Then I realized how close the hole was to the bell housing.
My tap T handle simply wouldn't fit, and caused the bit to be tilted instead of vertical. I couldn't get enough torque with just my fingers. I also couldn't get a vice grip to work in the limited space. I certainly wasn't pulling the engine and transmission out just for this, and I don't think it would have helped much anyway, since it would require a very long tap extension to reach the hole.
I finally just ordered some tap sockets from Amazon. These look like normal sockets, but have squared holes in the end for a tap. These worked perfectly.
Timecert kits come with everything you need to repair a hole. A similar product is the Helicoil; you can use whichever one you prefer. They work by having you drill out a larger hole, counter sink it slightly, tap new threads into it, and then screw in an insert that locks into place in the hole. After that, you can install your original screw in the new, strengthened hole. In an aluminum engine/transmission, this new insert will actually be stronger than the original hole, too.
Drilling out the Hole
The first step is to drill out the hole. I used a mix of a socket wrench and my power screwdriver to drive the the bit. Once I was convinced that it was far enough down, I extracted the bit and and vacuumed out the shavings with a shop vac.
Counter Sinking
The countersink tool is simple enough. I mounted it on a my power screwdriver, and simply ran it in the until it wouldn't go down any further, as per the instructions.
Cutting The Threads
Used a socket wrench with the tap to create new threads in the hole. I didn't want to risk the power screwdriver overpowering the tool and messing up the threads, and used the socket wrench exclusively. I removed any shavings with the shop vac.
Driving the Insert
The insert driver simply threads onto the insert. The important detail is to make sure that you oil the threads of the driver (I just used motor oil, after some googling suggested that was fine) so that it doesn't get stuck on the tool. I again drove the tool by hand with the socket wrench. You drive it all the way down until it is flush, and then keep turning it. There will be some resistance as the insert is pushed out into the aluminum, and then it will turn easily again. Then you simply extract the driver and you're done.
An M7 Timecard kit and its drill bit, countersink tool, tap and insert driver, as well as a set of tap sockets.
A more correctly aligned drill bit via a tap socket.
Installing the insert with the oiled insert driver.
Re-Installing the Dipstick Tube
With that out of the way, I re-installed the dipstick tube. I decided to put some silicone sealant around the otterstat seal that I was using in place of the O-ring, running my finger along it to get it all the way around the seal before inserting it into the dipstick hole. I added more sealant around the bottom of the dipstick tube itself before inserting it into the seal. I then inserted the screw into my newly repaired hole and tightened it with an 11mm socket.
Attatching the dipstick tube to the back of the cylinder head with an 11mm wrench.
The only other problem I had was that the dipstick itself didn't seem to want to go all the way down the tube. I wound up removing the tube and fitting the dipstick without it in the car, and it seemed fine. I re-installed the tube with the dipstick still in it without an issue. I then pulled the tube out and put it back in again, and it seemed to work. It required a little fiddling, but it went in well enough. I guess it was just a quirk.
The final detail was to attach the tube to the engine so that it wouldn't shift around. I reused one of the bolts on the back of the cylinder head that a lift ring is attached to. This took an 11mm wrench, and once it was done the dipstick was quite securely attached, sealed against the transmission, and leak-free.
Update: May 21, 2016:
I finally filled the transmission with six quarts of fluid. While adding the seventh quart (which was clearly too much), it started pouring out of the dipstick tube at the transmission and all over the floor of my garage. It turns out the seal got shifted when I had inserted the tube and wasn't actually sealing at all.
I had to remove the tube, put the seal back inside the hole in transmission, reinsert the tube, and tighten down the bolt to anchor the tube to the transmission before bolting the top of the tube to the cylinder head. I did not use any silicone sealant this time, since it didn't seam to help anyway. This seems to have fixed the problem, and no transmission fluid leaked out. It's still overfilled, but I'm expecting that this is more because the transmission was empty than anything else, and that once I run it and the fluid has circulated that the level will be more reasonable. If necessary, I'll drain some fluid after that.
Also, the dipstick itself is still being a bit of a pain. It seems like it has to be turned at just the right angle to seat all the way into the transmission, and then it can get stuck and has to be twisted again to pull it out. I'm not sure why this dipstick is being so difficult while the old one worked so easily, but it's not a huge problem.