Oil Mud in the Coolant Passages
Joe Angell
When I flipped over my 3.0L engine to swap the lower crankcase, I found that not all of the oil and coolant had been removed -- a mixture of it poured all over the floor. With the engine right side up again and the intake manifold off, I discovered that oil and gotten into the coolant passages as well. I needed to get that out of there.
Drain Plugs
I thought I'd start with the coolant drain plugs. These are located on either side of the block. On the passenger side, it is just above the oil filter When I removed the driver's side one (1-2-3 cylinders), a little oil came out, but not too much.
The passenger side (4-5-6) one was a different story. With the plug out, the opening appeared to be covered with plastic. It was clearly not, though -- it was dried oil. I pulled out a bunch of it with my picks, reaching as far into the block through that hole as I could to clean it out. At no point did I encounter liquid oil.
Dried oil packed behind the drain plug. This is the passenger side plug; the oil filter attachment point is just below here, with the top edge visible at the bottom of the image.
Some of the dried oil removed with some picks from the hole.
Cylinder Heads
I took a look at the location of the drain plug on my old stripped engine to see where exactly it was draining from. There are two plugs, one on each side of the "V" that makes up a V6. They open up into the coolant jacket -- the empty space around the piston liners. I needed to know how much of this gunk was in there, so I decided that the best course of action was to remove the heads.
The Timing Chains
The timing chains run from crankshaft to sprockets mounted on the ends of the camshafts. As the crank rotates once, the chains turn the camshafts twice (due to the smaller sprocket on the camshaft vs. the one on the crank), opening the inlet and exhaust ports in time with the movement of the pistons. Since the cams are in the heads, the timing chains need to be disconnected from the cams before the heads can be removed.
I decided not to completely remove the timing chains; I just needed to remove the sprockets from the camshafts so I could take the heads off the block. If I was very careful, I could avoid having to redo the timing when I reassembled it as well. (Update: I wasn't careful enough, and wound up having to redo the timing anyway, but it was easier than I expected.)
Checking for Wear
According to the manuals, you are supposed to check the condition of the chain and sprockets by inserting the solid end of a #51 drill bit between the two. If it fits, you need to replace both, and probably the tensioners as well. I didn't have a #51 drill bit handy, but it didn't matter -- there was no visible space between the chain and sprocket at all, and thus no where to insert the bit.
Locking the Tensioners
Before removing the chains themselves, you'll want to lock the tensioners that normally keep the chain tight. Locking them keeps their spring-loaded pistons from pushing against the chains, thus giving you a bit more slack in the chain itself.
To lock the tensioners, you use a small flathead screwdriver to turn the lock's slotted head counter-clockwise. This causes a finger to lock the ratchet on the a spring-loaded piston to keep the arm from extending against the shoe that the chain rides along. You can push the guide arm in with your finger while rotating the screw to line up the ratchet to get it to latch.
Be sure not to remove the locking screw, though -- you only want to turn it to lock the piston in its recessed position. The screw keeps a ball behind the spring from being lost, and if you take it out you'll have to replace the tensioner as the ball cannot be replaced.
Locations of the timing chain, sprockets, tensioners and shoes.
How the tensioner works.
I had no trouble locking the right tensioner, but the left one was so close to the chain that it wouldn't really latch. I wound up just carefully taking the off carefully while it was still unlocked, pushing it in with my fingers to keep it from moving out too far, and locking it after the fact.
Removing the Sprockets
A 5.5 mm hex wrench is used to remove the camshaft bolts in the center of the sprockets. You'll likely need to hold the crank with a wrench on the main pulley nut in order to break it free without turning the engine. My driver's side one needed a lot of force, ultimately requiring a cheater bar (in my case, a long pipe over the wrench handle) while holding the crank still with a socket wrench.
With the bolts out, you can wiggle the sprocket off the ends of the cams. Even with the tensioners locked, the chain is still pretty tight. If you didn't lock the tensioners, they'll spring outward once the chain is slacked from removing the sprocket.
I carefully wrapped the chain around the sprocket and zip tied them together. I also tried not to dislodge the chain from the crank. If I'm lucky, I can re-assemble the engine without having to retime it. (Update: Not lucky enough; I wound up having to retime it anyway).
The Head Bolts
Next you need to remove the head bolts. These run through the rocker arms and the head into the block, and together with the head gasket keep the combustion chamber sealed. There are eight of these on each side, and they require a 19mm socket. I also used my cheater bar over the handle of the wrench to get more leverage. Once they were all loose, I removed them the rest of the way with a power screwdriver and a socket adaptor.
The head bolts, marked with blue dots. Note the timing chain and sprockets have not yet been removed in this picture.
Breaking the bolts free with a 19mm socket on a wrench, and a long pipe slid over the handle
Use a power screwdriver with a socket adaptor to remove the loosened bolts.
The Head
With the head bolts out, the head needs to be broken free from the block. This is done by pacing a block of wood against the inside of the of the "V" and tapping it, which causes it to tip outward slightly and release the bond with the block. Note that you must tap from the inside of the "V", not from the outside, as the guide pins that stick out along the outside will keep the head from tilting inward. Remember that the head is pretty heavy (about 20 lbs), so don't hit it too hard.
Once the head has been freed, you can lift it off the block. Note that the rocker arms are secured to the head purely by the tension of the springs that hold them together and the head bolts, and may come loose from head on their own. If you want, you can pop them off before you remove the head to avoid dropping them, or you can just leave them on the head. Just be aware that if you tilt or flip the head too much, the rocker arms might fall off.
Important Note: Do not rotate the engine after removing the heads without securing the liners first. Doing so can cause the liners to lift up as the pistons move. Reseating the liners requires disassembling the rest of the engine, and is something you really want to avoid.
The Rocker Arms and Hydraulic Tappets
The 2.8L engine's rocker arms maintain a specific distance between the valve stem and the fingers of the arm via a kind of bolt/nut combination. You measure this distance with a feeler gauge, adjusting the nut until the optimum clearance is obtained between the "bolt" and the valve stem as described in the workshop manual.
The 3.0L engine uses more modern hydraulic lifters, or hydraulic tappets as they're called in the engine manual. The tappets are cylinders set in the end of each finger of the arm. According to my 1990 Premier/Monaco Workshop Manual, the tappet is in constant contact with the valve stem, and slides freely inside the end of the finger, avoiding the need to manually adjust them.
In my case, three of the tappets fell out of each rocker arm when I removed them from the head. The manual notes that it can be difficult to keep them in during assembly, suggesting masking tape until the assembly is secured to the head. The point is, it's normal for the tappets to be so loose that they fall out of the arm's fingers when you remove them. Just don't lose them.
One of the tappets slipping out of the rocker arm finger and resting on the valve spring. Each tappet maintains constant contact with the valve stem.
One of the tappets that I easily removed from the finger of the arm.
Examining the Heads
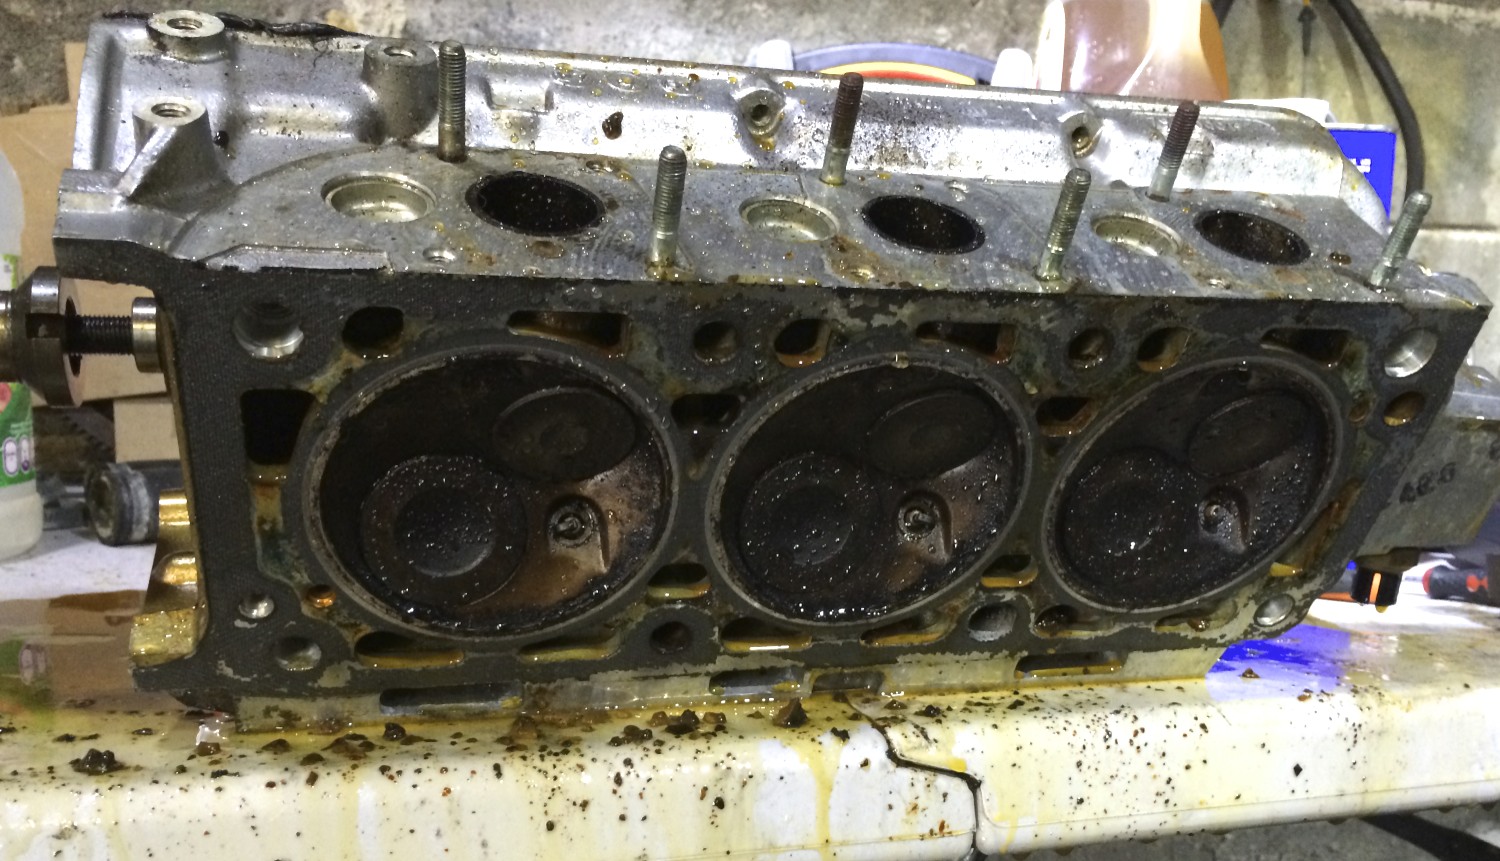
As I moved the head, a bunch of coolant mixed with oil poured out of the bad core plug on one end (see another post about replacing core plugs). Coolant runs around inside the heads through passages in the block, so this wasn't much of a surprise.
The head gaskets had come off with the heads. I pulled off them off, and saw oil was packed inside the oil and coolant holes there as well. At least the heads are light enough to transport in my car, making them much easier to clean.
Cylinder heads with the gaskets removed.
Oil mud is clearly visible coming from the holes in the head.
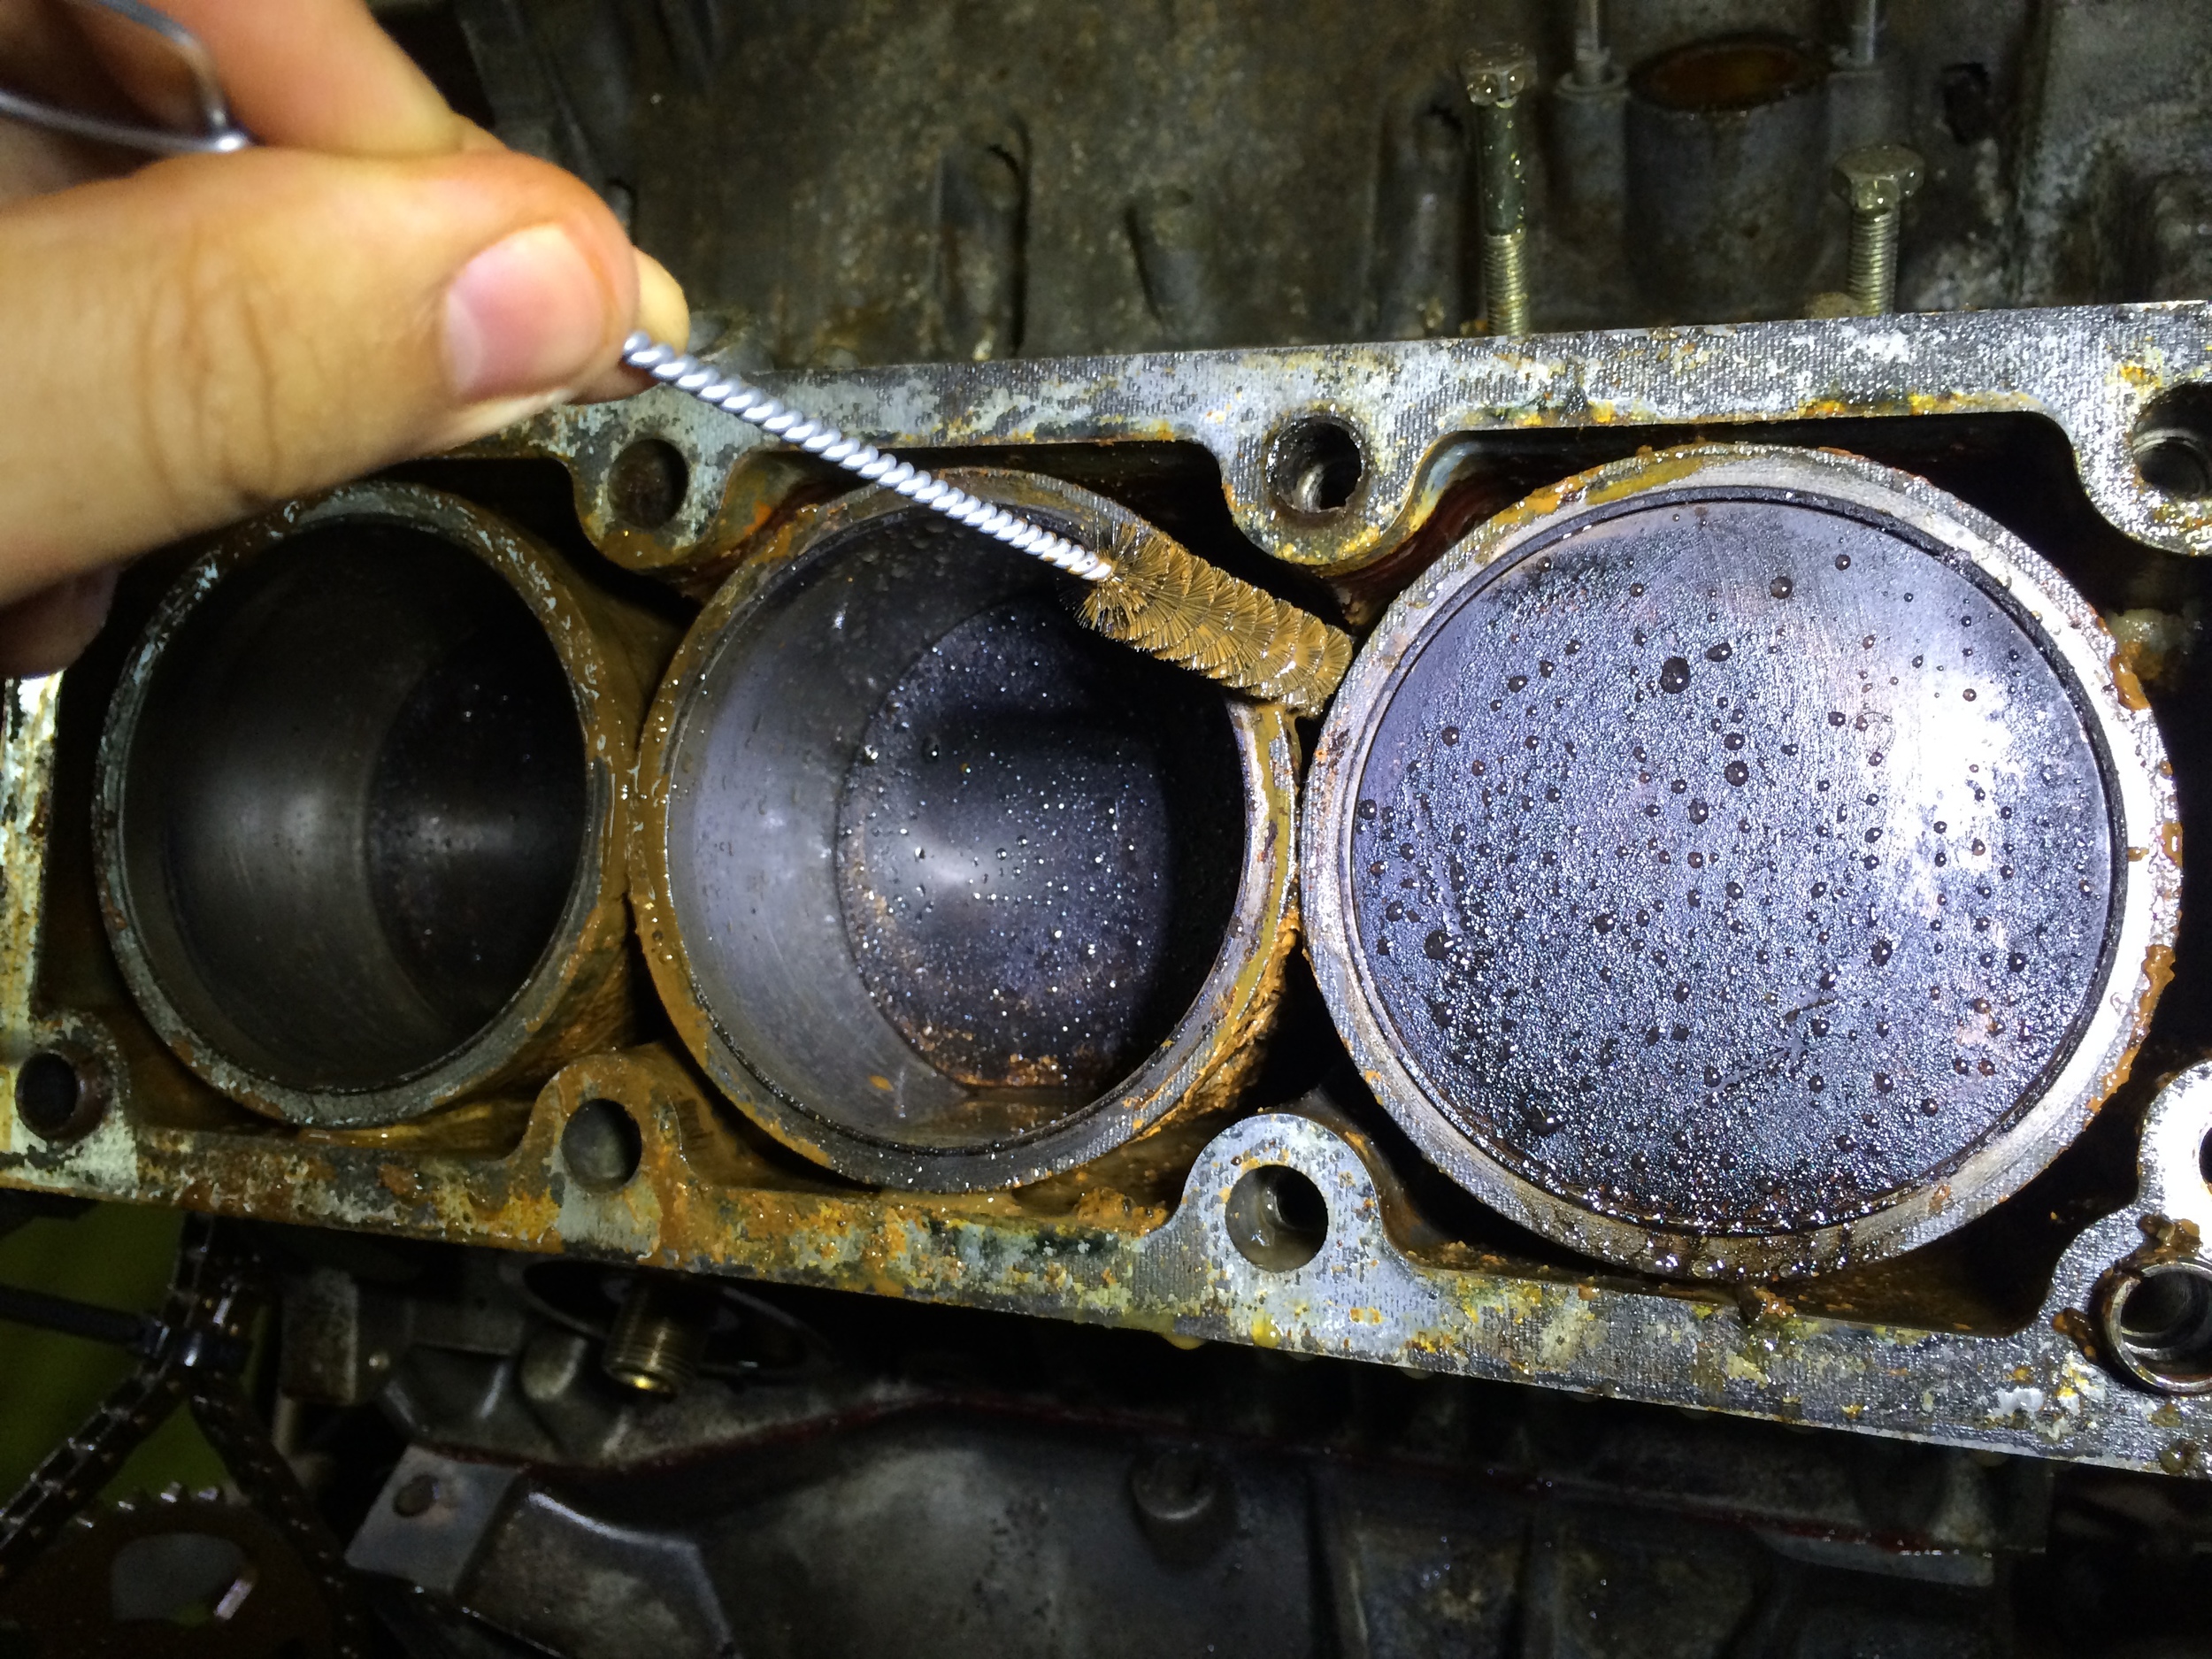
Examining the Coolant Jacket
With the heads out of the way, I could look into the jacket around the liners. One of the cylinders had oil filling much it, which likely occurred when removing the head. I tilted the engine on the stand and drained the oil into the pan, and mopped the rest out with paper towels.
The pistons sit in liners, which are sealed against the bottom of the block. You really, really don't want to shift these, since you'll have to take apart rest of the block (removing the bottom of the engine and the pistons themselves) to reseat them properly. Luckily, they're pretty hard to move accidentally, but you still want to be careful.
The space around the liners is the coolant jacket. Ideally, this would be filled with coolant or be completely empty. When I stripped down my 2.8L engine, the space was bone dry.
Not so in the 3.0L engine. I think the engine wasn't drained properly from the guys I bought it from, and I didn't think to drain it myself. There was a mix of oil and coolant "mud" filling the jacket on both sides. All of this needed to be cleaned out completely.
Another concern was the rusted metal bits that were visible in the gunk. The liners are steel, and this is likely rusted bits that flaked off, probably because the previous owner used water instead of antifreeze or something like that. My mechanic friend assured me that this was likely superficial. However, all these metal bits must be removed, or else they could clog up the radiator and other parts of the coolant system.
Oil collected in one of the cylinders, and oil/coolant mud filling the coolant jacket around them.
The rest of that side of the block, showing more of the gunk filling the jacket.
Rusted metal (right) from the liners.
Basic Cleanup
I spent an hour or so removing as much of the mud as I could from the 4-5-6 cylinder area with a hook-shaped pick. I got out a lot, but there is still a lot in there. I removed the coolant drain plug just above the oil filter and cleaned out as much as I could there, and went in through the top of the engine where the "Y" pipe mounts to clean out even more.
You can only do so much with picks, though; I really needed to get everything out, and the narrow gaps made it difficult.
Cleaning out the mud with a pick (bottom of the image)
A bunch of gunk removed from the engine.
Mud that was pulled out with the pick was deposited in an oil pan. This was from only one side of the engine, and it was still quite dirty.
Once I had enough of the mud out (for the time being), I secured the liners with large fender washers (50mm outer diameter with an M16 compatible inner diameter) and M12 bolts (25mm long with 1.5mm pitch threads), both of which I purchased from McMaster-Carr. These were tightened down to reduce the chance of the liners moving unexpectedly while I worked on getting the gunk out.
I soon after removed the other cylinder head. I saw the same thing there -- lots of gunk plugging up the coolant jacket.
Large washers and M12 bolts used to eliminate any chance of the liners moving. This really isn't enough washers and bolts, but it was all I had at the moment.
The 1-2-3 coolant jacket was just as bad as the other side.
Cleaning Tools
The best solution for cleaning the jacket is probably a pressure washer. Unfortunately, I don't have running water at my garage. I thought about buying some five gallon jugs and building a gravity feed system to get water into a pressures washer, but then I hit on a much simpler (and cheaper) idea: a Super Soaker.
First, modern Super Soakers suck. The ones in the 1990s had you pump up the gun to fill an air reservoir, firing water up to 50 feet. Later models used a constant pressure system that gave even more power. Modern ones are a shadow of that; some are simple electric guns, while others spray while you push the pump. These have at best a 30 foot range.
For my purposes, the pressure from the 30 foot range guns was enough -- I just needed a reasonably amount of pressure. The push-to-fire action also allowed me to more accurately control the spray. To keep the gun filled I brought four gallons of water with me from home, filling empty gallon Arizona Tea jugs for transport, as well a few empty extras to fill with waste water that would collect in the oil pan on the floor.
I addition to my picks (straight, hook and angled) and a pump-fire Super Sucker Freeze Blaster, I also ordered a number of nylon bristle brushes (aka "tube brushes"). These have a wire handle and a cylinder of nylon bristles pointing out in all directions. They're commonly used to clean tubes, pipes, fish tank aquarium pumps, etc. I got a few different sizes and lengths, but only wound up needing two of them.
I also ordered some jar spatulas. These are thin spatulas used to get the last bit out of a jar of food. I didn't wind up using them, but I did use another product I ordered: a "last drop" spatula. This had a hooked scrapper on one end and a spoon on the other. The ends are made of very soft rubber, but they're just the right size to scrape out the gunk. The scraper head did come off at one point, but I was able to recover it and slide it back on.
I also needed some degreaser to help break down the oil. I used some Simple Green, but any detergent should work fine. In my Google searches I found an anecdote that Cascade dishwasher detergent is used by Ford at times, but I didn't get a chance to try that out.
Super Soaker Freeze Blaster, "last drop" spatula, picks, and bristle brushes.,
Cleaning the Jacket
With these tools in hand, I was able to better clean the jacket. I titled the engine so the cylinders were perpendicular to the ground, and later so that they were tilted downward at an angle, thus making it easier to remove the debris. I used the hooked pick and "last drop" spatula to pull out as much material as I could. While this got a lot of it, there was only so much that scraping could do.
A couple dozen blasts with the Super Soaker removed even more of the debris, and made a mess -- even with good aim, you tend to deflect the water everywhere. I found that placing the gun's pump against the block and pushing the entire gun towards it to compress the pump and fire the water helped with the aim., although that wasn't always possible. After it drained, I'd liberally sprayed Simple Green in there, then flushed it out again.
After a few cycles of scraping out debris, flushing with the Super Soaker, and treating with degreaser, I shined a light into the jacket and found some harder gunk wedged into the corners. I used the straight pick to break it up and dragged as much of it out as I could.
After another flush, I started using the tube brushes to clean off the finer films of mud that were caking the jacket walls and liners. These did a decent job of getting more of bits of debris off, but it really wasn't possible to get everything perfectly clean.
It was also very hard to clean between the points where the cylinders come closest the jacket and each other. The lip on the liner makes the opening too wide for my picks or the scrapers, so I did the best I could.
I did some more degreasing and flushing cycles, repeating until only clean water seemed to come out. The parts still looked like they had a bit of a film of mud or light surface rust on them, but it was nothing that would plug up the radiator or sufficiently insulate the cylinders from being cooled, and I imagine that replacing the coolant after a few drives would take care of anything of significance. The other side used the same process. All told, this took the better part of a day.
The engine inverted for cleaning.
Spraying pressurized water into the jacket with a Super Soaker.
Muddy water pours out of the the head after spraying it with the water gun. The flexible head of the "last drop" spatula made it easier to get into tight areas and pull debris out.
Using a smaller tube brush to scrape finer mud from between the liners.
Cleaning the Cylinder Heads
The oil/coolant mix had also gotten into the cylinder heads oil and coolant ports. These were somewhat trickier to clean due to the curved passages inside the head. I was able to push around some of it with the "last drop" spatula, but the picks did the bulk of the work here. What I really needed was some sort of flexible picks with hardened ends, but those don't seem to exist.
I mostly used the straight pick here, pushing it as far into the cavities as I could. I tilted the cylinder head so that it would drain out into an oil pan on the floor. Once enough of the gunk was cleared, I used the Super Soaker to flush out the openings, and Simple Green to degrease. As more of the debris was removed, it became more clear where the channels were and where the pick needed to go. Some of the debris was hardened and needed to be broken up, but most of it wasn't too bad. I watched to make sure that water was moving freely through the channels during flushing, and kept flushing until only clean water came out.
The other head had a bad core plug, which I'd previously removed. This made it a bit easier to clean out the coolant passage immediately behind it. I thought about removing the other core plugs, but decided that it wasn't really necessary.
With most of the gunk out, I laid the head on its back and filled the coolant channels with white vinegar. Vinegar is mildly acidic and breaks down organic compounds like oil, and should remove some of the buildup on the surface of the coolant channels. To keep the vinegar from pouring out, I plugged the channels on the side with paper towels. I did try to heat the block with a heat gun to get a greater cleaning effect from the vinegar, but the giant heat sink of an aluminum head didn't really warm up to any appreciable degree.
Its worth noting that you should be careful not to get any vinegar on the valve seals, as those are rubber and will be ruined by the acidic vinegar. Luckily, those or on the other side of the head, and the valves are liquid-tight when closed, so there's not much risk of getting any on there.
While I waited for the vinegar to do its thing, I scrapped the remains of the old gasket off. This worked similarly to how I had cleaned the lower crankcase and oil pan gaskets, first by scraping with plastic scrappers, and then trying a bristle disc, being careful not to push the disc too hard against the metal. This residue seemed more stubborn that the crankcase residue, and I resorted to very lightly sanding some of the gasket material with course sandpaper (finer would have been better, but it was all I had on hand. I did this VERY carefully, as I did not want to damage the mating surfaces. I poured vinegar and even acetone on the head a few times to help soften the remnants in places, both of which worked pretty well in some spots while having less effect in others. In the end I got most of it off -- more than enough to ensure a good seal. I also had to add some more vinegar to keep the head filled as I removed the gasket remnants, as the paper towel I has using as a plug was slowly leaking vinegar into a pan on the floor.
With the head gasket bits cleaned up, it was time to get the vinegar out of the head. I removed the paper towel and drained the liquids, refilled the block with distilled water, and drained it again. I did this mostly to remove any leftover vinegar, and distilled water doesn't have the impurities that tap water would, and thus wouldn't leave any deposits in the coolant channels. I eventually took the heads home so I could flush them with more vinegar and hot water in the kitchen sink, which helped out even more.
I still had a few small bits of gasket residue to remove from the head. At this point I'd given up on plastic tools and bought some razor blades. I very carefully scraped off most of the material, but there was still some that was very stubborn. I was finally going to call it "good enough" when I showed pictures to my mechanic friend, and he told me I had to clean them up much more to get a good seal. After yet another pass to get all of the gaskets off, I was finally ready to reinstall the heads.
Dirty cylinder heads. Notice the oil plugging the passages in both heads.
After removing much of the gunk with picks, I tilted it over and alternated between spraying degreasers and water into the coolant and oil passages. The gunk on the table is some of the chunks that came out.
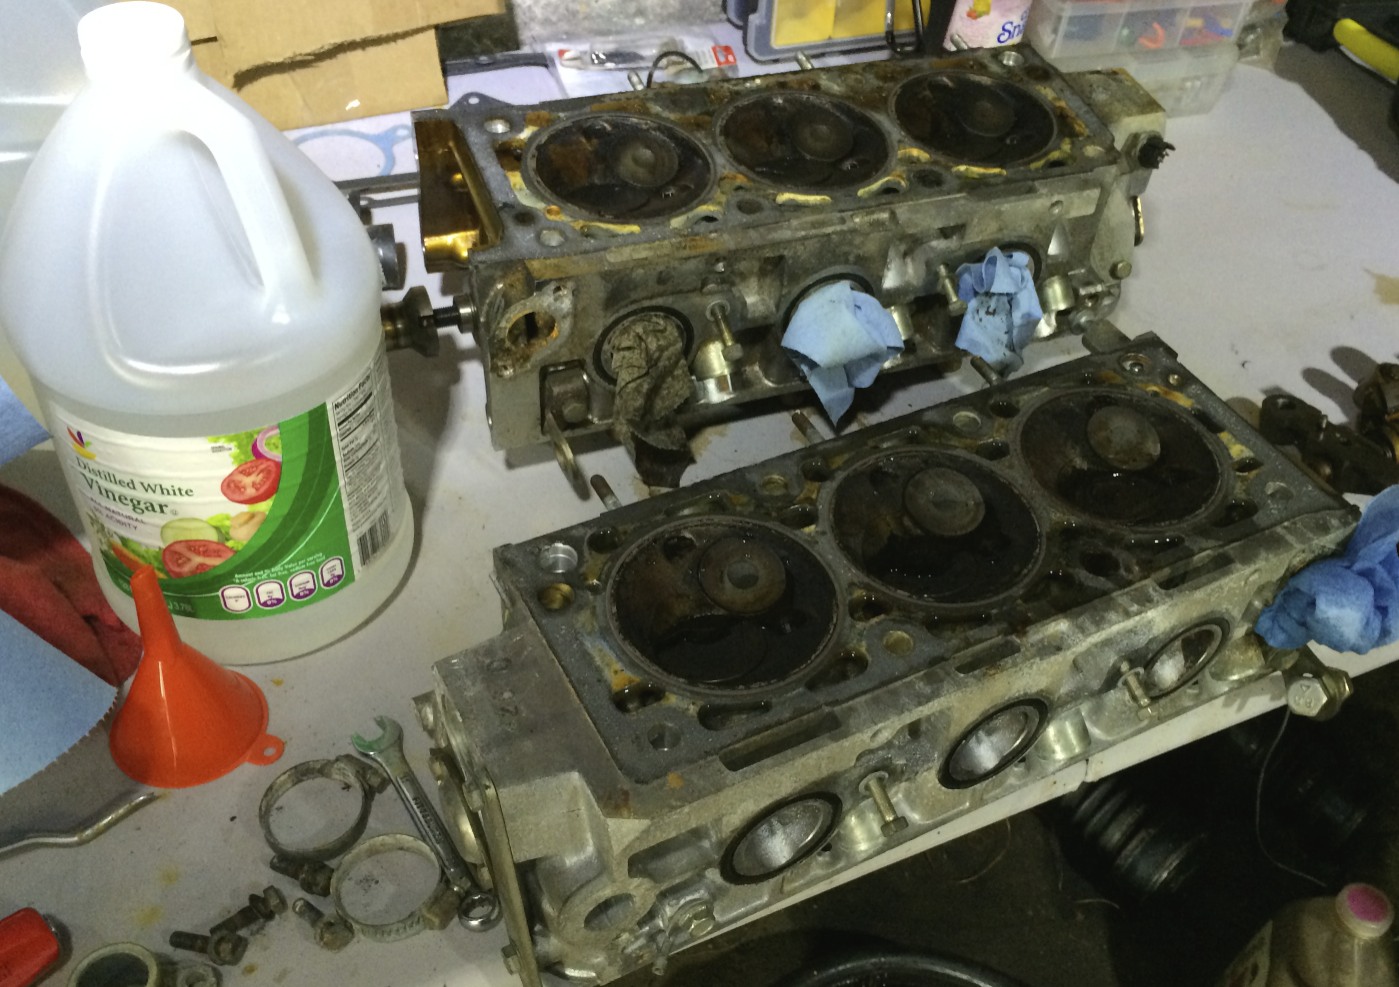
The near head's coolant passages filled with vinegar in order to further clean out the passages. While I waited, I removed the head gasket remnants with a combination of tools.

The mostly cleaned up cylinder head.